概述
注解处理器(Annotation Processor),是javac的一个工具,用来在编译时扫描和处理注解。
一个注解处理器以Java代码(或者编译过得字节码)作为输入,生成.java文件作为输出。
接下来我们模仿ButterKnife 实现一个@BindView的注解来了解Java注解处理器的使用。
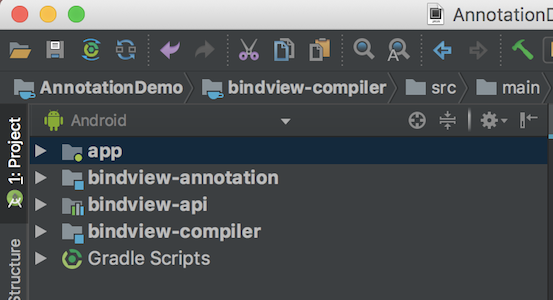
创建项目
模块说明:
bindview-annotation:定义注解,@BindView。bindview-compiler:定义注解处理器,处理被@BindView标记的代码,并在编译时生成xxxActivity_ViewBinding.javabindview-api:工具类,调用xxxActivity_ViewBinding.java中的方法,实现View的绑定。
bindview-annotation(自定义注解) 创建注解类BindView
1
2
3
4
5
@Retention (RetentionPolicy.CLASS) @Target (ElementType.FIELD) public @interface BindView { int value () }
bindview-compiler(注解处理器) 在该module的build.gradle中添加如下代码:
1
2
3
4
dependencies { implementation 'com.google.auto.service:auto-service:1.0-rc3' implementation project(':bindview-annotation' ) }
创建BindViewProcessor
1 2 3 4 5 6 7 8 9 10 11 12 13 14 15 16 17 18 19 20 21 22 23 24 25 26 27 28 29 30 31 32 33 34 35 36 37 38 39 40 41 42 43 44 45 46 47 48 49 50 51 52 53 54 55 56 57 58 59 60 61 62 63 64 65 66 67 68 69 70 71 72 73 74 75 76 77 @AutoService (Processor.class)public class BindViewProcessor extends AbstractProcessor private Messager mMessager; private Elements mElementUtils; private Map<String, ClassCreatorProxy> mProxyMap = new HashMap<>(); @Override public synchronized void init (ProcessingEnvironment processingEnvironment) super .init(processingEnvironment); mMessager = processingEnvironment.getMessager(); mElementUtils = processingEnvironment.getElementUtils(); } @Override public Set<String> getSupportedAnnotationTypes () return Collections.singleton(BindView.class.getCanonicalName()); } @Override public SourceVersion getSupportedSourceVersion () return SourceVersion.latestSupported(); } @Override public boolean process (Set<? extends TypeElement> set, RoundEnvironment roundEnvironment) mMessager.printMessage(Diagnostic.Kind.NOTE, "processing..." ); mProxyMap.clear(); Set<? extends Element> elements = roundEnvironment.getElementsAnnotatedWith(BindView.class); for (Element element : elements) { VariableElement variableElement = (VariableElement) element; TypeElement classElement = (TypeElement) variableElement.getEnclosingElement(); String fullClassName = classElement.getQualifiedName().toString(); ClassCreatorProxy proxy = mProxyMap.get(fullClassName); if (proxy == null ) { proxy = new ClassCreatorProxy(mElementUtils, classElement); mProxyMap.put(fullClassName, proxy); } BindView bindAnnotation = variableElement.getAnnotation(BindView.class); int id = bindAnnotation.value(); proxy.putElement(id, variableElement); } for (String key : mProxyMap.keySet()) { ClassCreatorProxy proxyInfo = mProxyMap.get(key); mMessager.printMessage(Diagnostic.Kind.NOTE, " --> create " + proxyInfo.getProxyClassFullName()); try { JavaFileObject jfo = processingEnv.getFiler().createSourceFile(proxyInfo.getProxyClassFullName(), proxyInfo.getTypeElement()); Writer writer = jfo.openWriter(); writer.write(proxyInfo.generateJavaCode()); writer.flush(); writer.close(); } catch (IOException e) { e.printStackTrace(); mMessager.printMessage(Diagnostic.Kind.NOTE, " --> create " + proxyInfo.getProxyClassFullName() + " error!" ); } } mMessager.printMessage(Diagnostic.Kind.NOTE, "process finish ..." ); return true ; } }
ClassCreatorProxy是创建Java代码的代理类:
1
2
3
4
5
6
7
8
9
10
11
12
13
14
15
16
17
18
19
20
21
22
23
24
25
26
27
28
29
30
31
32
33
34
35
36
37
38
39
40
41
42
43
44
45
46
47
48
49
50
51
52
53
54
public class ClassCreatorProxy private String mBindingClassName; private String mPackageName; private TypeElement mTypeElement; private Map<Integer, VariableElement> mVariableElementMap = new HashMap<>(); public ClassCreatorProxy (Elements elementUtils, TypeElement classElement) mTypeElement = classElement; PackageElement packageElement = elementUtils.getPackageOf(mTypeElement); String packageName = packageElement.getQualifiedName().toString(); String className = mTypeElement.getSimpleName().toString(); mPackageName = packageName; mBindingClassName = className + "_ViewBinding" ; } public void putElement (int id, VariableElement element) mVariableElementMap.put(id, element); } public String generateJavaCode () StringBuilder builder = new StringBuilder(); builder.append("package " ).append(mPackageName).append(";\n\n" ); builder.append("\n" ); builder.append("public class " ).append(mBindingClassName); builder.append(" {\n" ); generateMethods(builder); builder.append("\n" ); builder.append("}\n" ); return builder.toString(); } private void generateMethods (StringBuilder builder) builder.append("public void bind(" + mTypeElement.getQualifiedName() + " host) {\n" ); for (int id : mVariableElementMap.keySet()) { VariableElement element = mVariableElementMap.get(id); String name = element.getSimpleName().toString(); String type = element.asType().toString(); builder.append("host." + name).append(" = " ); builder.append("(" + type + ")(((android.app.Activity)host).findViewById(" + id + "));\n" ); } builder.append(" }\n" ); } public String getProxyClassFullName () return mPackageName + "." + mBindingClassName; } public TypeElement getTypeElement () return mTypeElement; } }
bindview-api(注解生成代码的调用工具类) 创建注解工具类BindViewTool
1
2
3
4
5
6
7
8
9
10
11
12
13
14
15
16
17
18
19
20
21
22
23
24
25
public class BindViewTool { public static void bind(Activity activity) { Class clz = activity.getClass(); try { Class bindViewClass = Class.forName(clz.getName() + "_ViewBinding" ); Method method = bindViewClass.getMethod("bind" , activity.getClass()); method.invoke(bindViewClass.newInstance(), activity); } catch (ClassNotFoundException e) { e.printStackTrace(); } catch (NoSuchMethodException e) { e.printStackTrace(); } catch (IllegalAccessException e) { e.printStackTrace(); } catch (InstantiationException e) { e.printStackTrace(); } catch (InvocationTargetException e) { e.printStackTrace(); } } }
使用注解 在app模块的build.gradle中添加如下代码:
1
2
3
4
5
6
7
dependencies { implementation project(':bindview-annotation' ) implementation project(':bindview-api' ) annotationProcessor project(':bindview-compiler' ) }
在MainActivity中使用注解:
1
2
3
4
5
6
7
8
9
10
11
12
13
14
15
public class MainActivity extends AppCompatActivity @BindView (R.id.content) TextView mContentText; @Override protected void onCreate (Bundle savedInstanceState) super .onCreate(savedInstanceState); setContentView(R.layout.activity_main); BindViewTool.bind(this ); mContentText.setText("From BindView" ); } }
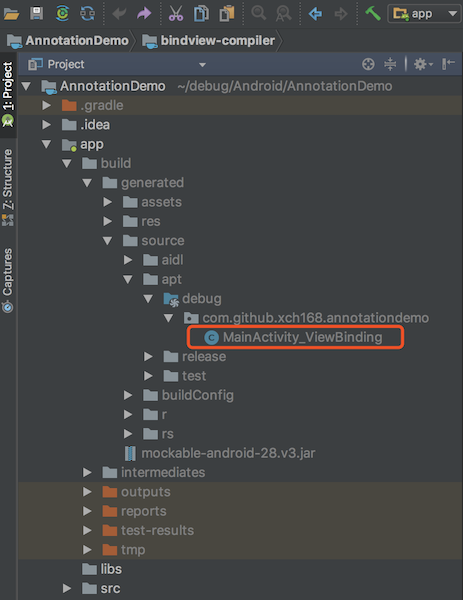
运行后生成的代码(路径 app/build/generated/source/apt):
MainActivity_ViewBinding代码:
1
2
3
4
5
public class MainActivity_ViewBinding public void bind (com.github.xch168.annotationdemo.MainActivity host) host.mContentText = (android.widget.TextView)(((android.app.Activity)host).findViewById(2131165228 )); } }
通过javapoet生成代码 上面生成代码的部分,是通过字符串拼接,过程非常繁琐。接下来就介绍一种更优雅的方式,使用javapoet。
添加依赖:
1
2
3
dependencies { implementation 'com.squareup:javapoet:1.10.0' }
在ClassCreatorProxy中添加如下代码
1
2
3
4
5
6
7
8
9
10
11
12
13
14
15
16
17
18
19
20
21
22
23
24
25
26
27
28
29
30
31
public class ClassCreatorProxy public TypeSpec generateJavaCodeByJavapoet () TypeSpec bindingClass = TypeSpec.classBuilder(mBindingClassName) .addModifiers(Modifier.PUBLIC) .addMethod(generateMethodsByJavapoet()) .build(); return bindingClass; } private MethodSpec generateMethodsByJavapoet () ClassName host = ClassName.bestGuess(mTypeElement.getQualifiedName().toString()); MethodSpec.Builder methodBuilder = MethodSpec.methodBuilder("bind" ) .addModifiers(Modifier.PUBLIC) .returns(void .class) .addParameter(host, "host" ); for (int id : mVariableElementMap.keySet()) { VariableElement element = mVariableElementMap.get(id); String name = element.getSimpleName().toString(); String type = element.asType().toString(); methodBuilder.addCode("host." + name + " = " + "(" + type + ")(((android.app.Activity)host).findViewById(" + id + "));" ); } return methodBuilder.build(); } public String getPackageName () return mPackageName; } }
在BindViewProcessor中调用:
1
2
3
4
5
6
7
8
9
10
11
12
13
14
15
16
@Override public boolean process (Set<? extends TypeElement> set, RoundEnvironment roundEnvironment) for (String key : mProxyMap.keySet()) { ClassCreatorProxy proxyInfo = mProxyMap.get(key); JavaFile javaFile = JavaFile.builder(proxyInfo.getPackageName(), proxyInfo.generateJavaCodeByJavapoet()).build(); try { javaFile.writeTo(processingEnv.getFiler()); } catch (IOException e) { e.printStackTrace(); } } mMessager.printMessage(Diagnostic.Kind.NOTE, "process finish ..." ); }
相比用StringBuilder拼Java代码,明显简介很多,且生成的代码是一样的。
参考文章
【Android】APT 自定义Java注解处理器 一小时搞明白注解处理器(Annotation Processor Tool) Android APT及基于APT的简单应用 Android 编译时注解-提升-butterknife javapoet