概述
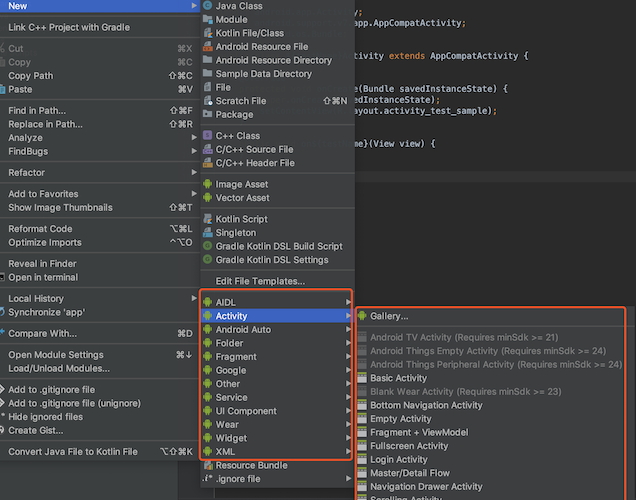
我们在使用Android Studio创建Activity、Fragment等等的时候,都会使用Android Studio提供的模板来简化我们创建的,使用模板时,我们只要做简单的配置,Android就能为我们生成相应的代码,所以使用模板可以提高开发的效率,接下来我们将学习如何去自定义一个符合自己项目框架的模板。
介绍
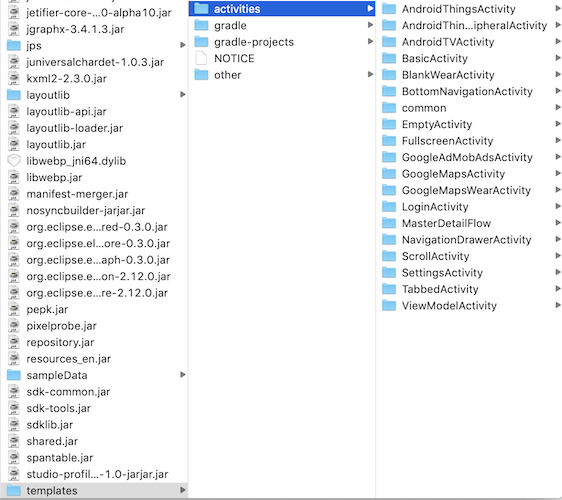
Android Studio模板的安装路径:<Android Studio安装目录>/plugins/android/lib/templates
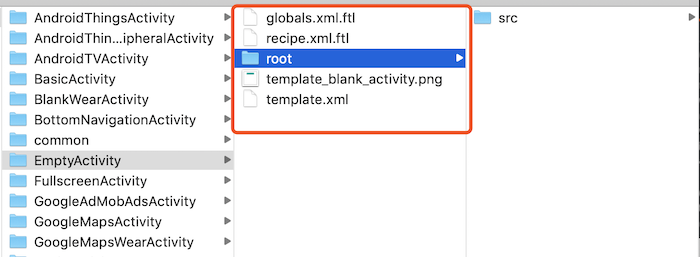
模板文件结构 Android Studio中已有的Empty Activity模板:
模板组成结构:
template.xml:定义模板参数
globals.xml.ftl:定义全局变量
recipe.xml.ftl:配置要引用的模板路径和生成的文件的路径
root文件:存放模板文件和资源文件
效果缩略图
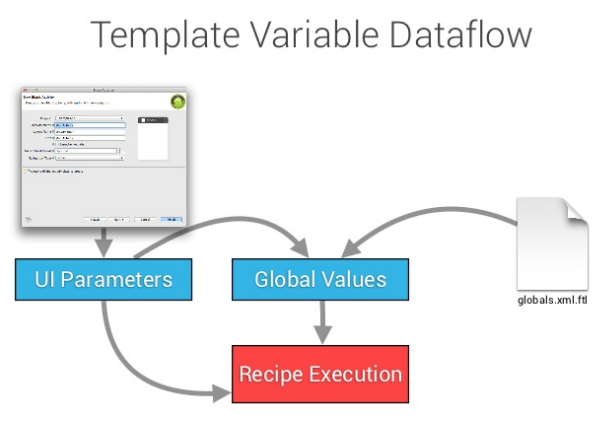
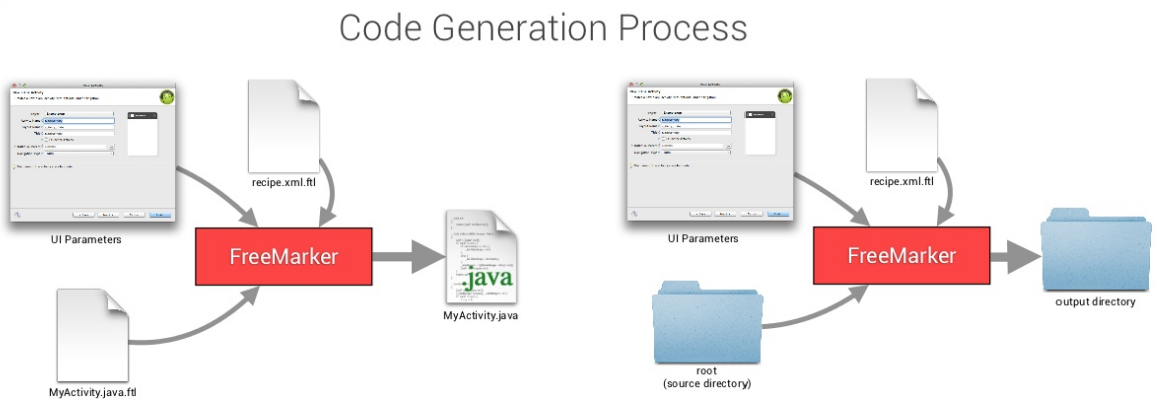
模板变量处理流程:
template.xml 1 2 3 4 5 6 7 8 9 10 11 12 13 14 15 16 17 18 19 20 21 22 23 24 25 26 27 28 29 30 31 32 33 34 35 36 37 38 39 40 41 42 43 44 45 46 47 48 49 50 51 52 53 54 55 56 57 58 59 60 61 62 63 64 65 66 67 68 69 <?xml version="1.0"?> <template format ="5" revision ="5" name ="Empty Activity" minApi ="9" minBuildApi ="14" description ="Creates a new empty activity" > <category value ="Activity" /> <formfactor value ="Mobile" /> <parameter id ="activityClass" name ="Activity Name" type ="string" constraints ="class|unique|nonempty" suggest ="${layoutToActivity(layoutName)}" default ="MainActivity" help ="The name of the activity class to create" /> <parameter id ="generateLayout" name ="Generate Layout File" type ="boolean" default ="true" help ="If true, a layout file will be generated" /> <parameter id ="layoutName" name ="Layout Name" type ="string" constraints ="layout|unique|nonempty" suggest ="${activityToLayout(activityClass)}" default ="activity_main" visibility ="generateLayout" help ="The name of the layout to create for the activity" /> <parameter id ="isLauncher" name ="Launcher Activity" type ="boolean" default ="false" help ="If true, this activity will have a CATEGORY_LAUNCHER intent filter, making it visible in the launcher" /> <parameter id ="backwardsCompatibility" name ="Backwards Compatibility (AppCompat)" type ="boolean" default ="true" help ="If false, this activity base class will be Activity instead of AppCompatActivity" /> <parameter id ="packageName" name ="Package name" type ="string" constraints ="package" default ="com.mycompany.myapp" /> <thumbs > <thumb > template_blank_activity.png</thumb > </thumbs > <globals file ="globals.xml.ftl" /> <execute file ="recipe.xml.ftl" /> </template >
说明 :
<template>中的name对应新建Activity时显示的名字<category>对应New的类别为Activity<parameter>对应界面上蓝色框的一个项,
id:唯一表示,最终通过该属性值,获取用户界面上的输入值
name:界面上Label提示语
type:输入值类型
constraints:值约束
suggest:建议值,比如填写ActivityName的时候,会给出LayoutName的建议值
help:底部显示的提示语
globals.xml.ftl 1 2 3 4 5 6 7 8 <globals > <global id ="hasNoActionBar" type ="boolean" value ="false" /> <global id ="parentActivityClass" value ="" /> <global id ="simpleLayoutName" value ="${layoutName}" /> <global id ="excludeMenu" type ="boolean" value ="true" /> <global id ="generateActivityTitle" type ="boolean" value ="false" /> <#include ".. /common /common_globals.xml.ftl " /> </globals >
这个文件用于定义一些全局变量。
说明 :
<global>:表示一个全局变量
id:变量名
type:变量类型
value:默认值
访问变量:${变量id}
recipe.xml.ftl 1 2 3 4 5 6 7 8 9 10 11 12 13 14 15 16 <#import "root: //activities /common /kotlin_macros.ftl " as kt > <recipe > <#include ".. /common /recipe_manifest.xml.ftl " /> <@kt.addAllKotlinDependencies /> <#if generateLayout > <#include ".. /common /recipe_simple.xml.ftl " /> <open file ="${escapeXmlAttribute(resOut)}/layout/${layoutName}.xml" /> </#if > <instantiate from ="root/src/app_package/SimpleActivity.${ktOrJavaExt}.ftl" to ="${escapeXmlAttribute(srcOut)}/${activityClass}.${ktOrJavaExt}" /> <open file ="${escapeXmlAttribute(srcOut)}/${activityClass}.${ktOrJavaExt}" /> </recipe >
该文件用于定义如何生成代码和文件。
说明 :
<#include>:导入另一个ftl文件<open>:在代码生成后打开指定文件,例如,当我们创建一个Activity后,AS会自动打开Activity及布局文件。<instantiate>:将.ftl文件转成.java或.kt文件。<copy>:用于从root文件夹中复制文件到目标目录。<merge>:用于合并文件,如将模板的strings.xml合并到我们项目中的strings.xml
Freemarker语法
AS 中模板的定义使用的是Freemarker的语法。
语法
${变量名}:访问变量值
<#if 变量名>:条件判断
<#include "xx.ftl">:引入其他模板文件
实例:EmptyActivity\root\src\app_package\SimpleActivity.java.ftl
1 2 3 4 5 6 7 8 9 10 11 12 13 14 15 16 17 18 19 20 21 22 23 24 package ${packageName};import ${superClassFqcn};import android.os.Bundle;<#if (includeCppSupport!false) && generateLayout> import android.widget.TextView;</#if> public class $ @Override protected void onCreate (Bundle savedInstanceState) super .onCreate(savedInstanceState); <#if generateLayout> setContentView(R.layout.${layoutName}); <#include "../../../../common/jni_code_usage.java.ftl"> <#elseif includeCppSupport!false> android.util.Log.d("${activityClass}" , stringFromJNI()); </#if> } <#include "../../../../common/jni_code_snippet.java.ftl"> }
从模板到代码的流程:
自定义MVP模板
在Google给出的MVP Sample中,每创建一个页面,需要创建:
XxActivity、XxFragment、XxContract、XxPresenter四个文件,步骤繁琐,且AS目前没有提供相应的模板,所以接下来将自定义一个MVP的模板,来简化这些繁琐的操作。
template.xml 1 2 3 4 5 6 7 8 9 10 11 12 13 14 15 16 17 18 19 20 21 22 23 24 25 26 27 28 29 30 31 32 33 34 35 36 37 38 39 40 41 42 43 44 45 46 47 48 49 50 51 52 53 54 55 56 57 58 59 60 61 62 63 64 65 66 67 68 69 70 71 72 73 74 75 76 77 78 79 80 81 82 83 84 85 86 87 88 89 90 91 92 93 94 95 96 97 98 99 <?xml version="1.0"?> <template format ="5" revision ="5" name ="Page" minApi ="9" minBuildApi ="14" description ="Creates a new MVP page" > <category value ="MVP" /> <formfactor value ="Mobile" /> <parameter id ="activityClass" name ="Activity Name" type ="string" constraints ="class|unique|nonempty" suggest ="${layoutToActivity(activityLayout)}" default ="MainActivity" help ="The name of the activity class to create" /> <parameter id ="activityLayout" name ="Activity Layout Name" type ="string" constraints ="layout|unique|nonempty" suggest ="${activityToLayout(activityClass)}" default ="activity_main" help ="The name of the layout to create for the activity" /> <parameter id ="fragmentClass" name ="Fragment Name" type ="string" constraints ="class|unique|nonempty" suggest ="${underscoreToCamelCase(classToResource(activityClass))}Fragment" default ="MainFragment" help ="The name of the fragment class to create" /> <parameter id ="fragmentLayout" name ="Fragment Layout Name" type ="string" constraints ="layout|unique|nonempty" suggest ="fragment_${classToResource(fragmentClass)}" default ="fragment_main" help ="The name of the layout to create for the fragment" /> <parameter id ="contractClass" name ="Contract Name" type ="string" constraints ="class|unique|nonempty" suggest ="${underscoreToCamelCase(classToResource(fragmentClass))}Contract" default ="MainViewModel" help ="The name of the contract class to create" /> <parameter id ="presenterClass" name ="Presenter Name" type ="string" constraints ="class|unique|nonempty" suggest ="${underscoreToCamelCase(classToResource(fragmentClass))}Presenter" default ="MainViewModel" help ="The name of the presenter class to create" /> <parameter id ="isLauncher" name ="Launcher Activity" type ="boolean" default ="false" help ="If true, this activity will have a CATEGORY_LAUNCHER intent filter, making it visible in the launcher" /> <parameter id ="packageName" name ="Package name" type ="string" constraints ="package" default ="com.mycompany.myapp" /> <parameter id ="pagePackage" name ="Page package path" type ="string" constraints ="package" suggest ="ui.${classToResource(fragmentClass)?replace('_', '')}" default ="ui.main" help ="The package path for the page." /> <thumbs > <thumb > template_blank_activity.png</thumb > </thumbs > <globals file ="globals.xml.ftl" /> <execute file ="recipe.xml.ftl" /> </template >
globals.xml.ftl 1 2 3 4 5 6 7 8 9 <?xml version="1.0"?> <globals > <global id ="hasNoActionBar" type ="boolean" value ="false" /> <global id ="parentActivityClass" value ="" /> <global id ="simpleLayoutName" value ="${activityLayout}" /> <global id ="excludeMenu" type ="boolean" value ="true" /> <global id ="generateActivityTitle" type ="boolean" value ="false" /> <#include ".. /.. /activities /common /common_globals.xml.ftl " /> </globals >
recipe.xml.ftl 1 2 3 4 5 6 7 8 9 10 11 12 13 14 15 16 17 18 19 20 21 22 23 24 25 26 27 28 29 30 31 32 33 34 <?xml version="1.0"?> <recipe > <#-- 生成mainfest 配置 -- > <merge from ="root/AndroidManifest.xml.ftl" to ="${escapeXmlAttribute(manifestOut)}/AndroidManifest.xml" /> <#-- 生成布局文件 -- > <instantiate from ="root/res/layout/activity.xml.ftl" to ="${escapeXmlAttribute(resOut)}/layout/${escapeXmlAttribute(activityLayout)}.xml" /> <instantiate from ="root/res/layout/fragment.xml.ftl" to ="${escapeXmlAttribute(resOut)}/layout/${escapeXmlAttribute(fragmentLayout)}.xml" /> <#-- 生成.java 文件 -- > <instantiate from ="root/src/app_package/Activity.${ktOrJavaExt}.ftl" to ="${escapeXmlAttribute(srcOut)}/${pagePackage?replace('.', '/')}/${activityClass}.${ktOrJavaExt}" /> <instantiate from ="root/src/app_package/Fragment.${ktOrJavaExt}.ftl" to ="${escapeXmlAttribute(srcOut)}/${pagePackage?replace('.', '/')}/${fragmentClass}.${ktOrJavaExt}" /> <instantiate from ="root/src/app_package/Contract.${ktOrJavaExt}.ftl" to ="${escapeXmlAttribute(srcOut)}/${pagePackage?replace('.', '/')}/${contractClass}.${ktOrJavaExt}" /> <instantiate from ="root/src/app_package/Presenter.${ktOrJavaExt}.ftl" to ="${escapeXmlAttribute(srcOut)}/${pagePackage?replace('.', '/')}/${presenterClass}.${ktOrJavaExt}" /> <#-- 打开文件.java 文件 -- > <open file ="${escapeXmlAttribute(srcOut)}/${pagePackage?replace('.', '/')}/${activityClass}.${ktOrJavaExt}" /> <open file ="${escapeXmlAttribute(srcOut)}/${pagePackage?replace('.', '/')}/${fragmentClass}.${ktOrJavaExt}" /> <open file ="${escapeXmlAttribute(srcOut)}/${pagePackage?replace('.', '/')}/${contractClass}.${ktOrJavaExt}" /> <open file ="${escapeXmlAttribute(srcOut)}/${pagePackage?replace('.', '/')}/${presenterClass}.${ktOrJavaExt}" /> <#-- 打开布局文件 -- > <open file ="${escapeXmlAttribute(resOut)}/layout/${escapeXmlAttribute(activityLayout)}.xml" /> <open file ="${escapeXmlAttribute(resOut)}/layout/${escapeXmlAttribute(fragmentLayout)}.xml" /> </recipe >
Activity.java.ftl 1 2 3 4 5 6 7 8 9 10 11 12 13 14 15 16 17 18 19 20 21 22 23 24 25 26 27 28 package ${packageName}.${pagePackage};import ${superClassFqcn};import android.os.Bundle;import com.github.xch168.mvp.util.ActivityUtil;import ${packageName}.R;public class $ @Override protected void onCreate (Bundle savedInstanceState) super .onCreate(savedInstanceState); setContentView(R.layout.${activityLayout}); ${fragmentClass} fragment = (${fragmentClass}) getSupportFragmentManager().findFragmentById(R.id.contentFrame); if (fragment == null ) { fragment = ${fragmentClass}.newInstance(); ActivityUtil.addFragmentToActivity(getSupportFragmentManager(), fragment, R.id.contentFrame); } new ${presenterClass}(fragment); } }
Fragment.java.ftl 1 2 3 4 5 6 7 8 9 10 11 12 13 14 15 16 17 18 19 20 21 22 23 24 25 26 27 28 29 30 31 32 33 34 35 36 37 38 39 40 41 42 package ${packageName}.${pagePackage};import android.os.Bundle;import android.support.annotation.NonNull;import android.support.v4.app.Fragment;import android.view.LayoutInflater;import android.view.View;import android.view.ViewGroup;import ${packageName}.R;public class $ private ${contractClass}.Presenter mPresenter; public static ${fragmentClass} newInstance() { Bundle arguments = new Bundle(); arguments.putString("" , "" ); ${fragmentClass} fragment = new ${fragmentClass}(); fragment.setArguments(arguments); return fragment; } @Override public View onCreateView (LayoutInflater inflater, ViewGroup container, Bundle savedInstanceState) View root = inflater.inflate(R.layout.${fragmentLayout}, container, false ); return root; } @Override public void onResume () super .onResume(); mPresenter.start(); } @Override public void setPresenter (@NonNull ${contractClass}.Presenter presenter) mPresenter = presenter; } }
Contract.java.ftl 1 2 3 4 5 6 7 8 9 10 11 12 13 14 15 package ${packageName}.${pagePackage};import com.github.xch168.mvp.ui.BasePresenter;import com.github.xch168.mvp.ui.BaseView;public interface $ interface View extends BaseView <Presenter > } interface Presenter extends BasePresenter } }
Presenter.java.ftl 1 2 3 4 5 6 7 8 9 10 11 12 13 14 15 16 17 18 package ${packageName}.${pagePackage};public class $ private final ${contractClass}.View mView; public ${presenterClass}(${contractClass}.View view) { mView = view; mView.setPresenter(this ); } @Override public void start () } }
AndroidManifest.xml.ftl 1 2 3 4 5 6 7 8 9 10 11 12 13 14 15 16 17 18 19 20 21 22 23 24 25 26 27 <manifest xmlns:android ="http://schemas.android.com/apk/res/android" package ="${packageName}" > <application > <activity android:name ="${packageName}.${pagePackage}.${activityClass}" <#if generateActivityTitle!true> <#if isNewProject > android:label="@string/app_name" <#else > android:label="@string/title_${activityToLayout(activityClass)}" </#if > </#if > <#if hasNoActionBar > android:theme="@style/${themeNameNoActionBar}" <#elseif (requireTheme !false ) && !hasApplicationTheme && appCompat > android:theme="@style/${themeName}" </#if > <#if buildApi gte 16 && parentActivityClass != "" > android:parentActivityName="${parentActivityClass}" </#if > > <#if parentActivityClass != "" > <meta-data android:name ="android.support.PARENT_ACTIVITY" android:value ="${parentActivityClass}" /> </#if > </activity > </application > </manifest >
使用MVP模板
将模板文件复制到<Android Studio安装目录>/plugins/android/lib/templates/{userName}/MVP目录下,然后重启Android Studio。
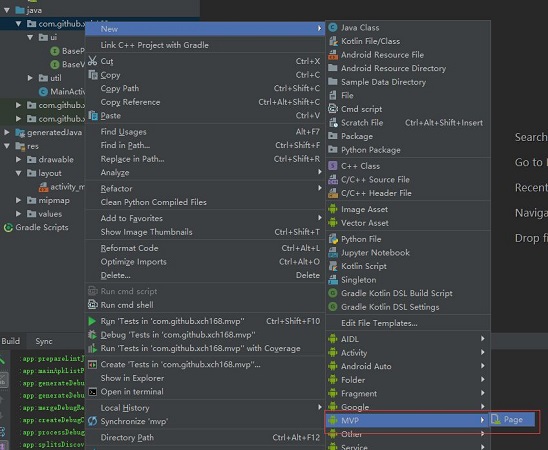
Step1 :新建一个MVP页面
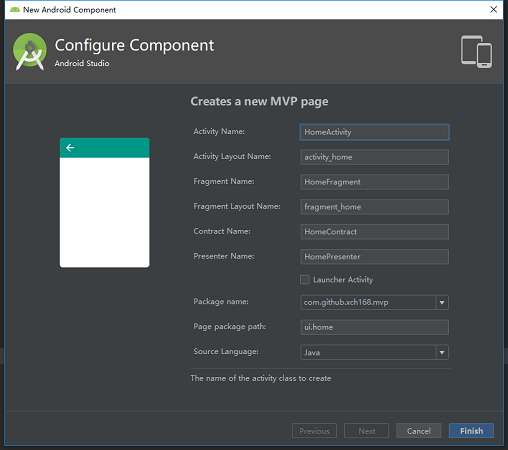
Step2 :配置参数
Step3 :点击Finish,将自动生成相关代码及资源文件
参考链接
Android Studio自定义模板 写页面竟然可以如此轻松 Custom Android Code Templates TemplateBuilder(中文版) Android Studio 轻松构建自定义模板 Android Studio Template(模板)开发
